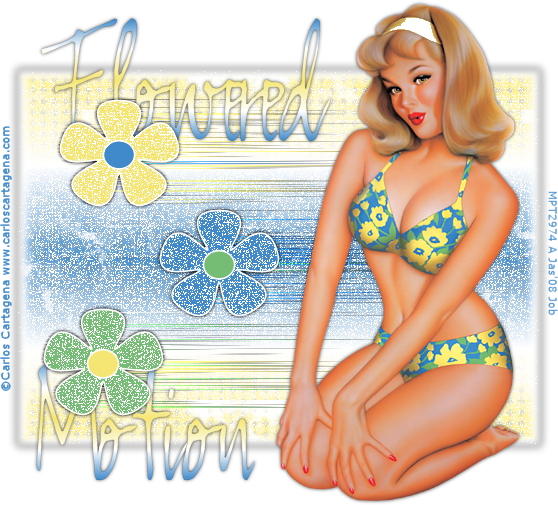
Tutorial ©Jascie July 14, 2005
Artwork ©Carlos Cartagena www.carloscartagena.com
This is an example only! Do not use his artwork without proper licensing!
Please visit Artistically Inclined Licensing for information on puchasing his artwork.
............................................................
Things you will need:
Paint Shop Pro
Tube of choice
Font of choice
Texture of choice
Gradient of choice
Plugin Filter: Dsb Flux - Blast
............................................................
Okay lets start, remember to save often and name all your layers as they are made.
Open your tube.
Open a new image 600 x 600 with a transparent background. Flood fill white.
Add a new raster layer.
Take your selections tool with these settings:
![]()
and make a rectangle size to your desire.
Flood fill your selection with white.
Add a drop shdow with these settings:
V & H 0, Opacity 75, Blur 5
Add a new raster layer, in your color palette set your foreground color to your gradient and add a texture to it.
Go selections - modify and contract by 10.
Flood fill your selection with your texturized gradient.
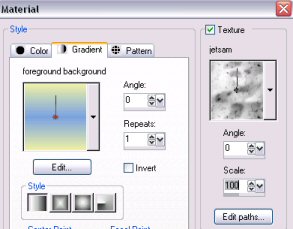
Now add a new layer, go back to your color palette set your foreground color to your color from the first layer or a different contrast color from your tube, and add a different texture to this color - preferably a fairly transparent one.
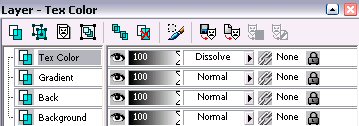
Now with the same layer activated set your blend mode to dissolve or a setting of your choice.
This is what you should have in your layers pallette as of now:
Go to your color palette and set your background to null and your foreground to your first main back color or another color from your tube.
With your preset shapes tool with these settings:
![]()
Make a flower about a third of the size of the width of the rectangle.
Change this layer to a raster layer.
Now duplicate twice and arrange to your desire on one side of your image, just be sure the middle flower is on top.
Now in your layers palette hide all your background layers and merge your flower layers visible.
Unhide all your layers once again.
Now take your selections tool and use these settings:
![]()
Select all three of your flowers, now go back to your layers palette and activate your Textured color layer add a new raster layer and flood fill with another different texturized color.
Repeat this last step for each color that you would like for your flowers. For ex. in mine I have three other colors so I have three color layers.
Once done deselect.
Now back in your layers palette, activate your flowers layer.
With your magic wand tool, and these settings:
![]()
Select outside your flowers. Go selections - modify expand by 1.
Now activate each color layer and hit delete.
Now go selections invert and activate your first color layer.
Take your eraser tool, with these settings:
![]()
And very carefully erase each color that you dont want in a certain area of the flower, remembering to switch the layers for each color.
You may have to duplicate erase in certain areas for the bottom color to show up if you have more than two colors.
Once you are happy with your flowers, go to your layer palette and hide all your background layers activate your flower layer and merge visible.
Add a drop shadow to these (I used the same settings as above but with blur set at 5.
Now duplicate your merged flower layer.
Reactivate the original merged flower layer and go effects - plugins - Dsb flux - Blast and use these settings:

If you have your flowers on the opposite side use left diection instead.
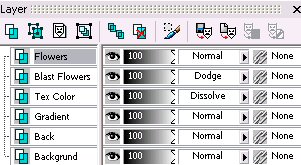
Now go to your blend mode and set it to dodge or mode of choice.
This is what you should have in your layers pallette as of now:
Now activate your top layer.
Add a new raster layer and add your watermarks and copyright iinformation.
Add your tube as a new layer and place to your desire, add a drop shadow to your tube (I used the same settings as the flowers).
Now its time to add your text font.
Once you add your font make sure its a raster layer and duplicate it.
Go back to your original font layer and set the blend mode to hard light.
Go to your duplicate layer and add a drop shadow to your font (I used the same settings as the flowers).
Then set this layers blend mode to darken.
During this tutorial while setting the blend modes you can adapt them to your likings for your tag.
Now Save it!
Ta Da! You're Done!
............................................................
Feel free to text link only or print out for own personal use. But do not copy it in anyway to put online, pass out, use for profit or rewrite without my permission.