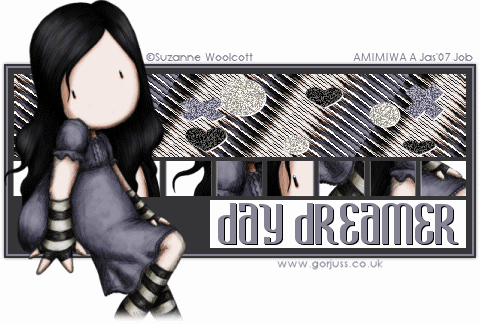
Tutorial ©Jascie October 25, 2005
Artwork ©Suzanne Woolcott www.suzannewoolcott.co.uk
This is an example only! Do not use her artwork without proper licensing!
Please visit www.gorjussart.com for information on puchasing her artwork.
............................................................
Things you will need:
Paint Shop Pro
Animation Shop
Tube of choice
Image of choice
Plugin Filter: DSB Flux - Bright Noise
Plugin Filter: Filter Factory Gallery U - Shear Tile
............................................................
Save my selections file to a place of choice.
Save the filters to your psp plugins folder.
Open the selections file and your tube of choice.
With your selections file open go shift + D, this will duplicate the file, close the original for future use.
Pick two complimentary colors from your tube and set the darker color as your forground color.
In your selections image, go selections - load/save selections - load from alpha channel and click on back 1.
Flood fill the selection with your dark color.
Deselect.
Add a new raster layer, go selections - load/save selections - load from alpha channel and click on back 2.
Flood fill this selection with your other color.
Deselect.
Add a new raster layer, go selections - load/save selections - load from alpha channel and click on back 3.
Flood fill this selection with your dark color.
Deselect.
Add a new raster layer, go selections - load/save selections - load from alpha channel and click on box 1.
Flood fill this selection with white or a light color from your tube.
Deselect.
Add a new raster layer, go selections - load/save selections - load from alpha channel and click on picture boxes.
Flood fill these selections with white.
Deselect.
Take your magic wand and select the very last square to your right.
Go edit copy.
Now go to your tube and duplicate the tube by going Shift + D.
Paste the selection as a new layer.
Position over part of tube you would like.
Now go selections - select all, selections - float, then selections - defloat.
Activate your tube layer and go edit - copy.
Then go back to your selections image and paste this into the selection.
Deselect.
Go back to your tube image and go selections - edit selection (this will change your selection to a red rectangle).
Take your mover tool and move this to a new location on your tube.
Click on the rectangle to make the marching ants reappear.
Activate your tube layer and go edit - copy.
Now back in your selections image using your magic wand select the next rectangle.
Go edit - paste into selection.
Deselect.
Repeat the last two steps for the rest of your white rectangles.
When you have all your pictures in place, add a new raster layer, go selections - load/save selections - load from alpha channel and click on box 2.
Flood fill the selection with white.
Now in your tube image, delete the white rectangle layer and deselect.
Then go edit - copy.
Back in your selections image, add a new raster layer, flood fill once again with white and paste the tube into your selection.
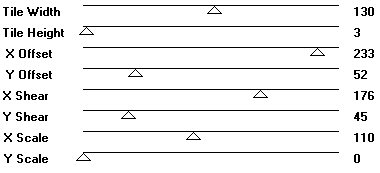
Now go effects - plugins - Filter Factory Gallery U - Shear Tile and use these settings:
Now deselect and add a new raster layer.
Go to your materials palette and set your foregrond color to a contrast color from your tube.
Now select your brush tool and select your brush ( I would suggest using a fairly full opacity brush of a shape, saying or symbol), and size it to your desire.
Dab the brush inside your rectangle a few times at various places(Dont worry about overhangs outside the rectangle).
You can use one or two colors for this as shown in my example.
In your layer palette activate the white box 2 layer.
Take your magic wand and click inside the rectangle.
Go selections - invert, activate the brush layer and go edit - cut.
Now hide this layer.
Activate one of the other layers and merge these visable.
Activate your brush layer once again.
Set the opacity of this layer to 70%, then go selections - select all, selections - float, then selections - defloat.
Now duplicate this layer twice, and activate the original.
Go effects - plugins DSB Flux - Bright Noise and use these settings:
Intensity 40 and Direction Mix
Activate the first brush copy and use the same effect just with the intensity set at 50.
Then lastly activate the second brush copy, use the same effect but the intensity set at 60.
Now deselect.
Now go image - canvas size and use these settings:
size - 600 x 600 and placement - center
Now you can go to your tube copy and paste it as a new layer position to the left of the bottom white square.
Resize the tube if needed.<br>Add a drop shadow with these settings:
V & H 0, Opacity 50, and Blur 5.
Now click on your text tool set it at a font of your choice with settings at vector, stroke 2.
In your materials palette set your foreground to your dark back color and your background to your light back color.
Add your text over the bottom white square.
And add the same drop shadow.
Add any watermarks and copyright information needed.
Crop arond the edges of the image.
Now go to your layers palette and hide the first and second brush copy layers.
Go edit - copy - copy merged.
Open Animation Shop and paste this as a new image onto your canvas.
Go back to your PSP and hide the original brush layer and unhide the first copy.
Go edit - copy - copy merged.
Back in Animation Shop right click your image and go paste - paste after current frame.
Go back to your PSP and hide the first brush copy layer and unhide the second copy.
Go edit - copy - copy merged.
Back in Animation Shop right click your image and go paste - paste after current frame.
Now go to animation resize animation and size to your desire.
Now Save it!
Ta Da! You're Done!
............................................................
Feel free to text link only or print out for own personal use. But do not copy it in anyway to put online, pass out, use for profit or rewrite without my permission.